linux搭建danted
摘:关于linux平台上搭建socks5代理的日记
搭建方法
在ubuntu下面直接运行apt-get install dante-server就可以一键安装dante-server代理了。
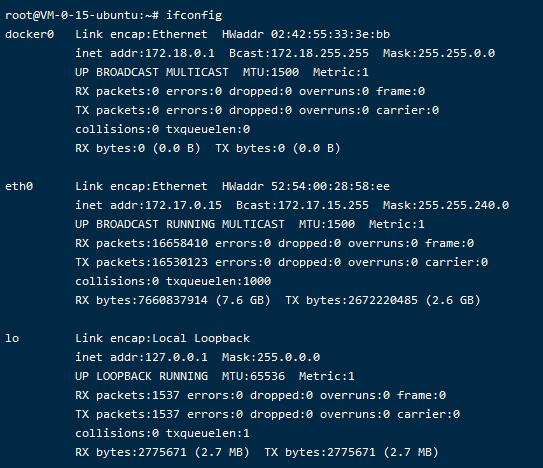
然后将/etc/danted.conf,修改为下面内容就行了。eth0为ifconfig查看的本机网卡。
启动danted: service danted start
关闭danted: service danted stop
下面给一个简单粗暴的配置文件,不做任何限制。
logoutput: /var/log/danted.log
internal: eth0 port = 80
external: eth0
method: username none
user.privileged: root
user.notprivileged: nobody
user.libwrap: nobody
client pass {
    from: 0.0.0.0/0 to: 0.0.0.0/0
    log: connect disconnect
}
pass {
    from: 0.0.0.0/0 to: 0.0.0.0/0 port gt 1023
    command: bind
    log: connect disconnect
}
pass {
    from: 0.0.0.0/0 to: 0.0.0.0/0
    command: connect udpassociate
    log: connect disconnect
}
block {
    from: 0.0.0.0/0 to: 0.0.0.0/0
    log: connect error
}
配置文件说明
如果使用user.notprivileged: socks5,则需要在系统中添加socks5用户。
sudo useradd socks5 # 这个用户名和上文配置文件里写的对应
sudo passwd socks5
然后需要在/etc/passwd中将socks5用户的shell改为/bin/false(/sbin/nologin没有/bin/false严格)
# 日志输出文件路径
logoutput: /var/log/danted.log
# 表示进口IP或者网卡,如果是双网卡,那么会和出口的不一样
internal: 0.0.0.0 port = 1081
# 表示出口IP或者网卡,也就是所谓的上行链路
external: 113.20.157.159

# 用户认证
method: username # 也可以设置为username none 即不使用用户认证
# 如果做了什么需要特权的事情,就动用下面的用户
user.privileged: root
# 如果正常使用,就使用下面这个非特权账号
user.notprivileged: socks5 # 也可以设置成nobody
# 如果编译时候有libwrap支持,执行libwrap命令时需要libwrap
user.libwrap: nobody

# 指定哪些ip的客户端允许连接socks代理。
# connect和disconnect大概意思应该是连接建立和断开的时候都写入日志。
client pass {
    from: 0.0.0.0/0 port 1-65535 to: 0.0.0.0/0
    log: connect disconnect
}
# 不允许访问127开头的网段,记住127开头的都是内部地址,不应该让它访问
block {
   from: 0.0.0.0/0 to: 127.0.0.0/8
   log: connect disconnect
}
# 不允许访问 169.254.0.0/16
block {
   from: 0.0.0.0/0 to: 169.254.0.0/16
   log: connect disconnect
}
# 不允许访问 10.0.0.0/8
block {
   from: 0.0.0.0/0 to: 10.0.0.0/8
   log: connect disconnect
}
# 不允许访问 172.16.0.0/12
block {
   from: 0.0.0.0/0 to: 172.16.0.0/12
   log: connect disconnect
}
# 不允许访问 192.168.0.0/16
block {
   from: 0.0.0.0/0 to: 192.168.0.0/16
   log: connect disconnect
}
# 不允许访问 224.0.0.0/4
block {
   from: 0.0.0.0/0 to: 224.0.0.0/4
   log: connect disconnect
}
# 不允许访问 240.0.0.0/4
block {
   from: 0.0.0.0/0 to: 240.0.0.0/4
   log: connect disconnect
}
# 允许任何场景下bind 1023以上的端口。
pass {
   from: 0.0.0.0/0 to: 0.0.0.0/0 port gt 1023
   command: bind
   log: connect disconnect
}
# 允许bind-replay
pass {
   from: 0.0.0.0/0 to: 0.0.0.0/0
   command: bindreply udpreply
   log: connect disconnect
}
# 允许udpassociate
pass {
   from: 0.0.0.0/0 to: 0.0.0.0/0
   command: connect udpassociate
   log: connect disconnect
}
# 默认阻止
block {
   from: 0.0.0.0/0 to: 0.0.0.0/0
   log: connect disconnect
}
以下是关于bind、connect、udpassociate、bindreply、udpreply选项的说明:
bind指令:用于客户端向服务器上报自己的反向连接监听地址(应用场景如 FTP 下载,客户端需要接受来自服务器的连接)。
connect指令:用于客户端请求服务器进行代理。
udpassociate指令:用于请求建立到 UDP 数据报中继的连接。The Dante SOCKS server supports five commands that can be used in the rule statements (bind, connect, udpassociate, bindrepy, udpreply). Conceptually, these fall into two groups; the first three correspond to requests made by the internal clients. The from address will be the address of the internal client and the to address will be the address of the external machine the client wishes to communicate with. The remaining two (bindreply and udpreply) correspond to the result of communication made by external hosts, either a TCP connection made to a port binding created with bind, or an UDP packet sent to a port bound with udpassociate. For these two commands, the from address will correspond to the external host, and the to address to the internal client. For this reason, separate rules have been created for the two sets of commands.
参考自:
Minimal server configuration
一些问题
docker情况下的网卡配置
我搭建dante-server的ubuntu服务器上安装的有docker.然后ifconfig显示的是

inet addr:172.17.0.15 Bcast:172.17.15.255 Mask:255.255.240.0这明显就是docker的地址。然后我试着在/etc/danted.conf里修改配置文件,把internal和external换成外网ip,然后
internal: 外网ip port = 80
external: 外网ip
会发现无法绑定外网IP,然后就只能写
internal: eth0 port = 80
external: eth0
或者
internal: 172.17.0.15 port = 80
external: 172.17.0.15
然后在浏览器设置socket5代理时ip地址写外网ip就行了。
danted无法记录日志
在 ubuntu 20.04 LTS 系统下面安装 danted v1.4.2 后,在 /var/log/ 下没有发现日志文件。root@VM-8-7-ubuntu:~# cat /etc/*release DISTRIB_ID=Ubuntu DISTRIB_RELEASE=20.04 DISTRIB_CODENAME=focal DISTRIB_DESCRIPTION="Ubuntu 20.04 LTS"后来发现是 danted.service 服务配置文件默认配置danted服务在 /var 目录只有只读权限。将 danted.conf 中的 logoutput: /var/log/danted.log 改为 logoutput: /tmp/danted.log 即可解决。
root@VM-8-7-ubuntu:~# danted -v Dante v1.4.2. Copyright (c) 1997 - 2014 Inferno Nettverk A/S, Norway root@VM-8-7-ubuntu:~# cat /etc/systemd/system/multi-user.target.wants/danted.service [Unit] Description=SOCKS (v4 and v5) proxy daemon (danted) Documentation=man:danted(8) man:danted.conf(5) After=network.target [Service] Type=simple PIDFile=/run/danted.pid ExecStart=/usr/sbin/danted ExecStartPre=/bin/sh -c ' \ uid=`sed -n -e "s/[[:space:]]//g" -e "s/#.*//" -e "/^user\\.privileged/{s/[^:]*://p;q;}" /etc/danted.conf`; \ if [ -n "$uid" ]; then \ touch /var/run/danted.pid; \ chown $uid /var/run/danted.pid; \ fi \ ' PrivateTmp=yes //danted服务没有以下目录的访问权限 InaccessibleDirectories=/boot /home /media /mnt /opt /root //danted服务具有以下目录的只读权限 ReadOnlyDirectories=/bin /etc /lib -/lib64 /sbin /usr /var DeviceAllow=/dev/null rw [Install] WantedBy=multi-user.target参考自:Dante socks server not running as root -> no access to /var/log
本作品采用 知识共享署名-相同方式共享 4.0 国际许可协议 进行许可。