[Item Pipeline] - 爬虫项目和数据管道
摘要:关于 Scrapy 中 pipeline 中 ITEM_PIPELINES 的使用 以及 close_spider 和start _spider、from_crawler等方法的介绍
在先前的几节中,不像其他Scrapy 教程那样从一个Scrapy 项目开讲,我更着重一个爬虫最基础的部分,然后再逐步拓展。本节正式开始创建一个Scrapy 项目,并讲讲Scrapy 中pipeline。
创建爬虫项目
在先前 [Command line tool] - 命令行工具 中提及了在命令行中创建爬虫项目的方法:
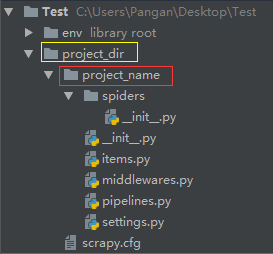
scrapy startproject <project_name> [project_dir]例如:
scrapy startproject project_name project_dir意味着最外层的文件夹的名字为 project_dir ,爬虫项目名称叫做 project_name ,大家可以自行修改。另外新的爬虫项目中并没有创建任何爬虫文件,即在 spiders 文件夹下并没有爬虫文件,我们需要通过命令行创建。

创建爬虫需要查阅先前的两篇文章:
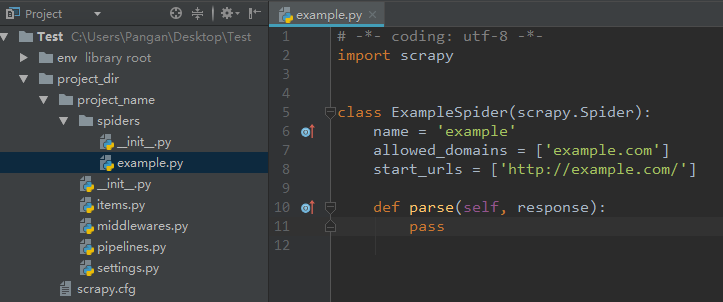
如果我们默认的我们是继承 scrapy.Spider 类创建爬虫,进入爬虫项目文件夹使用如下命令:
scrapy genspider example example.com等价于:
scrapy genspider -t basic example example.com此时发现spiders文件夹下就有自动生成了爬虫文件:

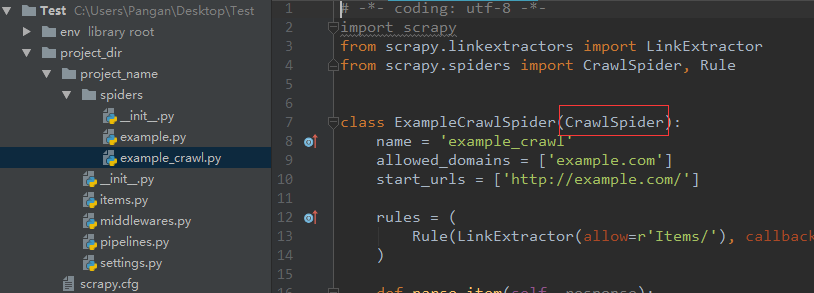
当然我们也可以继承 CrawlSpider:
scrapy genspider -t crawl example_crawl http://example.com
项目文件解释
items.py之前在单文件爬虫中我们已经学习了 Item 的作用和用法,将 item 的定义从 spider 中写到该文件作用是一样的,只不过是将作用不同的代码区分开来,使项目模块化,之后需要在爬虫文件中使用时只要在爬虫文件中加载定义的 item 即可。
middlewares.py这是对爬虫项目的扩展,在深入学习爬虫后我们可能需要对抗不同网站的反爬虫策略都可以在这进行定制。
settings.py爬虫项目的全局配置,以后会将它的一些常用参数。另外要为单独的爬虫配置参数你可能需要使用 custom_settings。
pipelines.pypipeline 主要用于接收从spider中返回的 Item ,通过 pipeline 的各个组件决定是否继续处理数据还是丢弃数据不再处理。主要功能如下:
- 清理数据
- 验证数据
- 数据查重
- 数据储存
每个 item pipeline 都是一个 Python 的类,它必须包含下面的方法:
process_item(self, item, spider)必须返回一个数据字典或者Item 对象或者Twisted Deferred 或者 DropItem exception(以后可能不再支持)
open_spider(self, spider)当爬虫运行时,这个方法会被调用。
close_spider(self, spider)当爬虫关闭时,这个方法被调用。
项目例子
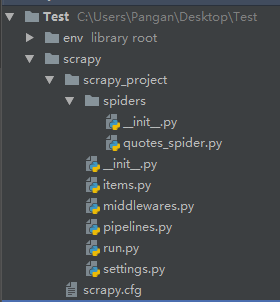
文件结构如下,依旧是使用虚拟环境运行爬虫项目:

quotes_spider.py
# -*- coding: utf-8 -*-
import scrapy
from scrapy_project.items import QuotesItem, QuotesLoader


class QuotesSpider(scrapy.Spider):
    name = 'quotes'
    allowed_domains = ['toscrape.com']

    def __init__(self, category=None, *args, **kwargs):
        super(QuotesSpider, self).__init__(*args, **kwargs)
        self.start_urls = ['http://quotes.toscrape.com/tag/%s/' % category, ]

    def parse(self, response):
        quote_block = response.css('div.quote')
        for quote in quote_block:
            loader = QuotesLoader(selector=quote)
            loader.add_css('text', 'span.text::text')
            loader.add_xpath('author', 'span/small/text()')
            yield loader.load_item()

        next_page = response.css('li.next a::attr("href")').extract_first()
        if next_page is not None:
            yield response.follow(next_page, self.parse)
items.py
# -*- coding: utf-8 -*-

# Define here the models for your scraped items
#
# See documentation in:
# http://doc.scrapy.org/en/latest/topics/items.html

import scrapy
import random
from scrapy.loader import ItemLoader
from scrapy.loader.processors import MapCompose, Join, TakeFirst


def text_process(text):  # 为演示而写的函数
    """将text中的两个中文引号去掉,再将句子序列化,最后随机选取两个单词,返回列表
    在text的输出处理器中我们用Join函数将两个单词用-连接起来最后最后的结果保存到文件
    """
    word_list = text.replace(u'“', '').replace(u'”', '').split()
    return random.sample(word_list, 2)


class QuotesItem(scrapy.Item):
    text = scrapy.Field()
    author = scrapy.Field()


class QuotesLoader(ItemLoader):
    default_item_class = QuotesItem  # 设置默认的Item对象,在spider中就不用另外写
    default_output_processor = TakeFirst()
    text_in = MapCompose(text_process)
    text_out = Join(separator=u'-')
pipelines.py
# -*- coding: utf-8 -*-

# Define your item pipelines here
#
# Don't forget to add your pipeline to the ITEM_PIPELINES setting
# See: http://doc.scrapy.org/en/latest/topics/item-pipeline.html

import json
import codecs


class JsonWriterPipeline(object):  # 我们可以根据它的作用进行命名

    def open_spider(self, spider):
        self.file = codecs.open('items.json', 'w', 'utf-8')

    def close_spider(self, spider):
        self.file.close()  # 爬虫关闭时关闭文件

    def process_item(self, item, spider):  # 按行写如数据到文件
        line = json.dumps(dict(item)) + "\n"
        self.file.write(line)
        return item


class ScrapyProjectPipeline(object):  # 这是自动生成的我们暂时不用
    def process_item(self, item, spider):
        return item
最后,虽然我们定义了一个pipelines 但是默认情况下是没有启用这个pipelines ,我们需要在settings.py 中更改对应设置:
# Configure item pipelines
# See http://scrapy.readthedocs.org/en/latest/topics/item-pipeline.html
ITEM_PIPELINES = {
   # 'scrapy_project.pipelines.ScrapyProjectPipeline': 300,  # 默认生成
   'scrapy_project.pipelines.JsonWriterPipeline': 300,  # 自定义
}
运行 run.py 从而运行爬虫项目 scrapy_project 中的爬虫文件 quotes_spider.py 中定义的quotes 爬虫,这里的 quotes 是 QuotesSpider 类的name 属性。
# filename: run.py
from scrapy import cmdline
cmdline.execute("scrapy crawl quotes -a category=life".split())
结果文件:
{"text": "ways-everything", "author": "Albert Einstein"}
{"text": "to-for", "author": "Andr\u00e9 Gide"}
{"text": "with-head", "author": "Marilyn Monroe"}
{"text": "where-have", "author": "Douglas Adams"}
{"text": "books,-sleepy", "author": "Mark Twain"}
{"text": "is-to", "author": "Allen Saunders"}
{"text": "There-you", "author": "Dr. Seuss"}
{"text": "like-is", "author": "Albert Einstein"}
{"text": "Life-about", "author": "George Bernard Shaw"}
{"text": "it.-blunders", "author": "Ralph Waldo Emerson"}
{"text": "at-of", "author": "Mark Twain"}
{"text": "when-life", "author": "Jimi Hendrix"}
{"text": "truth-hurt", "author": "Khaled Hosseini"}
在写这篇文章的时候遇到了item 中定义 serializer 没有发挥作用的问题,查阅了一些资料好像可以通过Item Loader才行,具体可以查阅我之前的文章,以及我查到的另一个问答:
Item Loaders - 数据传递的另一中方式
Correct way to nest Item data in scrapy
其他 pipelines 的实现范例
官方文档传送门:Item Pipeline - Scrapy 1.4.0 documentation
将数据存储到MongoDB
这个例子中 MongoDB 的相关配置写在了 setting.py 文件中了,本例中演示 from_crawler() 方法的使用(下面的代码是官方文档中的,我暂时还没用过 MongoDB,以后再重写)
import pymongo

class MongoPipeline(object):
    collection_name = 'scrapy_items'
    def __init__(self, mongo_uri, mongo_db):
        self.mongo_uri = mongo_uri
        self.mongo_db = mongo_db

    @classmethod
    def from_crawler(cls, crawler):
        return cls(
            mongo_uri=crawler.settings.get('MONGO_URI'),
            mongo_db=crawler.settings.get('MONGO_DATABASE', 'items')
        )

    def open_spider(self, spider):
        self.client = pymongo.MongoClient(self.mongo_uri)
        self.db = self.client[self.mongo_db]

    def close_spider(self, spider):
        self.client.close()

    def process_item(self, item, spider):
        self.db[self.collection_name].insert_one(dict(item))
        return item
另外我们还可以定义其他的pipline ,当 Item 到达pipelines 时后逐一通过它们,当然需要在设置中作相应优先配置, 也就是 ITEM_PIPELINES 中的值,这些值一般在 0 到 1000 ,小的值在大的值之前运行。
比如说,我想把 text 太长的 item 过滤掉,再在上面的 pipelines.py 添加如下代码:
from scrapy.exceptions import DropItem

class FilterPipeline(object):

    def process_item(self, item, spider):
        if len(item['text']) > 12:
            raise DropItem("Text is too long:\n %s" % item)
        else:
            return item
然后在 setting.py 中设置优先级:
ITEM_PIPELINES = {
    'scrapy_project.pipelines.FilterPipeline': 100,
    'scrapy_project.pipelines.JsonWriterPipeline': 200,
}
关于process_item的补充说明
每个 item pipeline 都是一个 Python 的类,它必须包含下面的方法:
process_item(self, item, spider)
返回值:
 '''多个pipeline的时候
  这个返回item的作用是为了下一个pipeline使用,如果不返回的话,下一个就不能执行。也就是如果要使item经过下一个自定义的pipline那就使用return item,要是不经过就不返回item就行。
  执行顺序,都打开open_spider,然后执行下面sprocess_item方法,循环执行,在执行close_spider方法
 '''
调用例子:
from scrapy.exceptions import DropItem

class FilterPipeline(object):

    def process_item(self, item, spider):
        if len(item['text']) > 12:
            raise DropItem("Text is too long:\n %s" % item)
        else:
            return item
参考
参考自:Item Pipeline - 爬虫项目和数据管道 - 知乎,感谢作者。
本作品采用 知识共享署名-相同方式共享 4.0 国际许可协议 进行许可。